
最近在做组里的项目,为了满足甲方的要求,在组内服务器上对 Qwen-32B 模型进行了 Lora 微调。之后甲方要求测试模型服务,但是不提供服务器进行部署 😅,没办法,只能租服务器部署提供远程访问。在租赁的服务器上部署模型之前,我在本地事先跑通了完整的部署和测试流程,整个过程比较简单,按照 ms-swift 文档 deploy 就行(前期使用 ms-swift 进行 sft 的)。
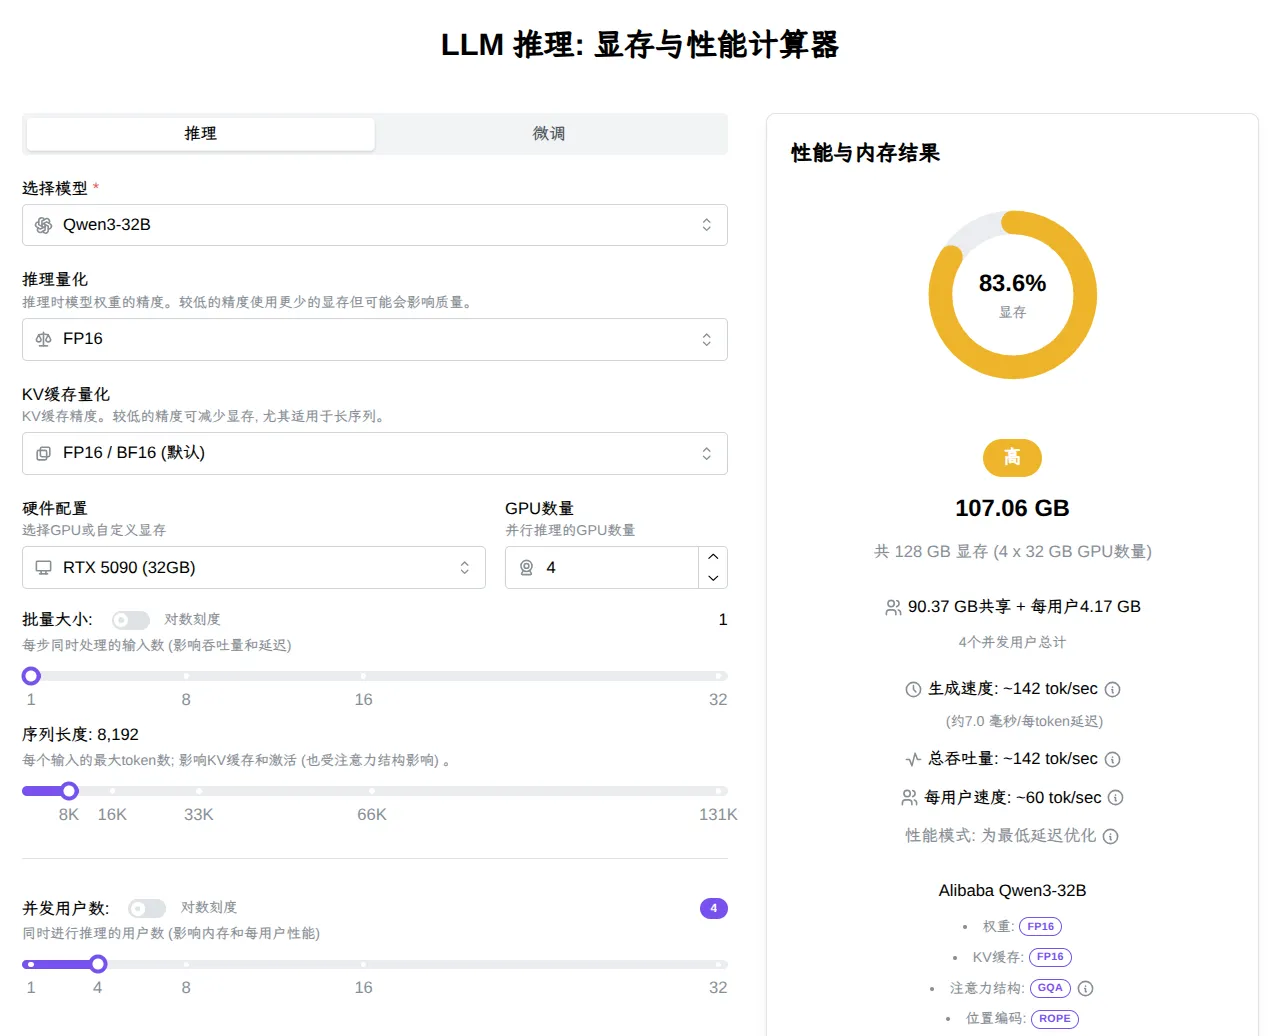
出于 AutoDL GPU 服务器的性价比高,在通过 vram-calculator 计算部署和推理需要的大致显存后,租赁了 vGPU 32GB x 4 的实例。原本以为很快就能交付部署,谁能想一个坑接着一个坑的排,最终 AI 在我的辅助下也是和我一起解决了所有问题。推理成功的那一刻再一次体会到了一点点解决编程 bug 的激动 😭
镜像环境不匹配
这是最坑的,官网没有任何提示 vGPU 不能用最新的镜像,最后还是给客服提 bug 时,客服才说 vGPU 用不了最新的镜像 🤡。我就请问了,不能用别在镜像列表里显示啊,显示也该提示允许的 GPU 型号吧,真服咧。(9.7 写这篇博客时已经支持了)
1. 镜像环境选择
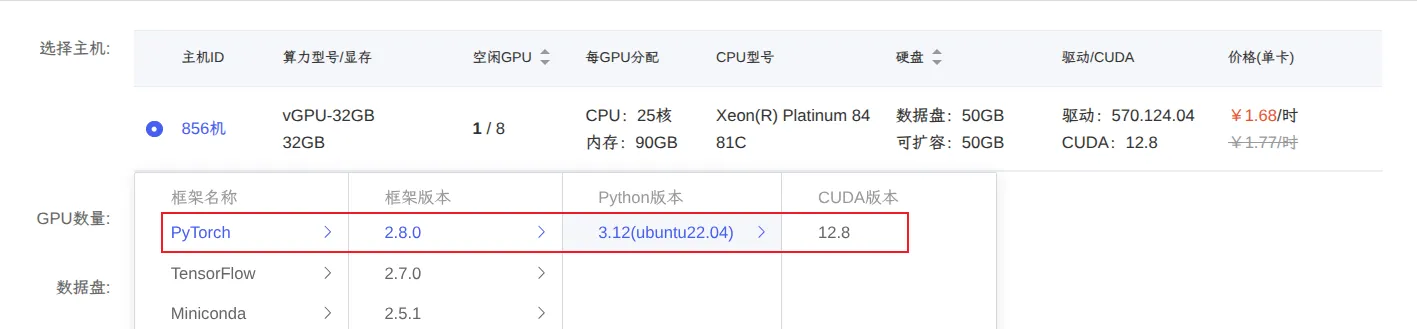
本着“用新不用旧”的原则,我最开始直接选择了平台提供的基于 CUDA 12.8 的官方镜像,使用了当时较新的 PyTorch 版本。
2. 多卡通信测试失败
其实在实际进行多卡测试之前,我是先走一遍正常的部署流程的:
python -m venv venv
source ./venv/bin/activate

pip install ms-swift vllm

./deploy.sh

# deploy.sh 内容如下
CUDA_VISIBLE_DEVICES=0,1,2,3 \
swift deploy \
  --model /root/autodl-tmp/Qwen3-32B \
  --adapters /root/autodl-tmp/checkpoint \
  --infer_backend vllm \
  --tensor_parallel_size 4 \
  --max_model_len 8192 \
  --max_new_tokens 4096
pip install 相关依赖,然后执行推理,出现了vLLM 多进程 Worker 初始化失败错误,大致日志如下(复现 bug 时,无法选择此镜像了):
Exception: WorkerProc initialization failed due to an exception in a background process. See stack trace for root cause.
...
RuntimeError: Engine core initialization failed. See root cause above. Failed core proc(s): {}
与 AI 进行多次讨论、排查之后,依然未解决问题。只能尝试选择联系客服,客服给我一个脚本,来测试多卡之间通信是否正常。
脚本主要的流程是:在多卡环境下,对一个大张量进行 all_reduce 操作(这里是连续进行 10 次 all_reduce 操作),并统计其平均带宽和耗时。内容如下:
import os
import torch
import time


if __name__ == '__main__':
    rank = int(os.environ['LOCAL_RANK'])
    torch.distributed.init_process_group(backend='nccl')
    device = torch.device('cuda', rank)
    # ViT-Large, 0.3B params.
    x = torch.ones(24, 1024 * 12, 1024, dtype=torch.float16).cuda(device)
    # Warmup.
    for i in range(5):
        y = torch.distributed.all_reduce(x)
    torch.cuda.synchronize(device)
    # Benchmark.
    iterations = 10
    tic = time.time()
    for i in range(iterations):
        y = torch.distributed.all_reduce(x)
    torch.cuda.synchronize(device)
    diff_time = time.time() - tic
    if rank == 0:
        data_size = x.numel() * 2 * 2 * iterations / (1024 ** 3)
        print({'bandwidth (GB/s)': round(data_size / diff_time, 2),
               'time': round(diff_time, 3)})
使用主机自带的 Base 环境(先埋个坑)执行 torchrun 命令后,程序立即崩溃。错误日志如下:
torchrun --nproc_per_node=auto test.py
E0826 17:03:57.491000 2025 site-packages/torch/distributed/elastic/multiprocessing/api.py:874] failed (exitcode: -11) local_rank: 0 (pid: 2039) of binary: /root/miniconda3/bin/python
Traceback (most recent call last):
  File "/root/miniconda3/bin/torchrun", line 8, in <module>
    sys.exit(main())
             ^^^^^^
  File "/root/miniconda3/lib/python3.12/site-packages/torch/distributed/elastic/multiprocessing/errors/__init__.py", line 357, in wrapper
    return f(*args, **kwargs)
           ^^^^^^^^^^^^^^^^^^
  File "/root/miniconda3/lib/python3.12/site-packages/torch/distributed/run.py", line 901, in main
    run(args)
  File "/root/miniconda3/lib/python3.12/site-packages/torch/distributed/run.py", line 892, in run
    elastic_launch(
  File "/root/miniconda3/lib/python3.12/site-packages/torch/distributed/launcher/api.py", line 143, in __call__
    return launch_agent(self._config, self._entrypoint, list(args))
           ^^^^^^^^^^^^^^^^^^^^^^^^^^^^^^^^^^^^^^^^^^^^^^^^^^^^^^^^
  File "/root/miniconda3/lib/python3.12/site-packages/torch/distributed/launcher/api.py", line 277, in launch_agent
    raise ChildFailedError(
torch.distributed.elastic.multiprocessing.errors.ChildFailedError:
======================================================
test.py FAILED
------------------------------------------------------
Failures:
  <NO_OTHER_FAILURES>
------------------------------------------------------
Root Cause (first observed failure):
[0]:
  time      : 2025-08-26_17:03:57
  host      : autodl-container-5d66449c84-940777de
  rank      : 0 (local_rank: 0)
  exitcode  : -11 (pid: 2039)
  error_file: <N/A>
  traceback : Signal 11 (SIGSEGV) received by PID 2039
======================================================
进程因 exitcode: -11 而失败,并收到 Signal 11 (SIGSEGV),这是一个典型的段错误,意味着程序访问了无效的内存地址。这通常不是 Python 代码逻辑错误,而是底层 C++/CUDA 代码层面出现了问题。
3. 问题排查:分析 NCCL 通信失败原因
3.1 最小化张量测试
创建一个试脚本,使用极小的张量:
import os
import torch

if __name__ == '__main__':
    rank = int(os.environ['LOCAL_RANK'])
    torch.distributed.init_process_group(backend='nccl')
    device = torch.device('cuda', rank)

    # 使用很小的张量
    x = torch.ones(10, 10, 10, dtype=torch.float16).cuda(device)
    print(f"Rank {rank}: Tensor created, size: {x.numel() * 2 / 1024:.2f} KB")

    # 测试 all_reduce
    print(f"Rank {rank}: Testing all_reduce...")
    torch.distributed.all_reduce(x)  # <- 在这里崩溃!
    print(f"Rank {rank}: all_reduce successful!")
结果:即使是 2KB 的小张量也会触发段错误。
3.2 仅初始化进程组
import os
import torch

if __name__ == '__main__':
    rank = int(os.environ['LOCAL_RANK'])
    world_size = int(os.environ['WORLD_SIZE'])

    # 仅初始化和销毁进程组,不做 all_reduce
    torch.distributed.init_process_group(backend='nccl', rank=rank, world_size=world_size)
    device = torch.device('cuda', rank)
    x = torch.ones(10, dtype=torch.float16).cuda(device)
    torch.distributed.destroy_process_group()
结果:成功运行!说明进程组初始化没问题,问题出在 all_reduce 操作。
3.3 启用 NCCL 调试信息
添加 NCCL 调试环境变量:
NCCL_DEBUG=WARN torchrun --nproc_per_node=2 test_allreduce.py
然后在日志中可以看到比较关键的警告信息:
[2025-08-28 10:09:03] NCCL WARN Retrieve cuGetErrorString failed with 0 status 1
[2025-08-28 10:09:03] NCCL WARN CUDA some PFN functions not found in the library
发现:NCCL 无法正确调用某些 CUDA 函数,表明库之间的兼容性出现了问题。
3.4 切换到 Gloo 后端验证
使用 gloo 后端替代 nccl:
import os
import torch
import time

if __name__ == '__main__':
    rank = int(os.environ['LOCAL_RANK'])

    # 使用 gloo 后端而不是 nccl
    torch.distributed.init_process_group(backend='gloo')
    device = torch.device('cuda', rank)

    # 使用原始大小的张量
    x = torch.ones(24, 1024 * 12, 1024, dtype=torch.float16).cuda(device)

    # Warmup
    for i in range(5):
        torch.distributed.all_reduce(x)
    torch.cuda.synchronize(device)

    # Benchmark
    iterations = 10
    tic = time.time()
    for i in range(iterations):
        torch.distributed.all_reduce(x)
    torch.cuda.synchronize(device)
    diff_time = time.time() - tic

    if rank == 0:
        data_size = x.numel() * 2 * 2 * iterations / (1024 ** 3)
        print(f'Bandwidth: {round(data_size / diff_time, 2)} GB/s')
结果:成功运行!这证实了问题确实是 NCCL 触发的,并且是兼容性问题。
Gloo 是一个由 Facebook 开发的,用于分布式训练的通信库后端 。
核心功能:Gloo 基于 TCP/IP 协议,提供了一套高效的集体通信操作,用于在不同计算节点之间同步数据和模型参数 。
GPU 分布式训练:虽然 Gloo 也支持 GPU,但性能通常不如专为 NVIDIA GPU 深度优化的 NCCL 后端。
4. 问题根因
-
NCCL 2.27.3 无法正确调用 CUDA 12.8 的某些函数
-
错误信息:
CUDA some PFN functions not found in the library -
这表明 NCCL 库与当前 CUDA 版本存在不兼容
-
-
容器环境可能进一步导致了兼容性问题
- AutoDL 容器环境中的 CUDA 配置可能与 NCCL 预期的环境有差异,某些底层 CUDA 函数的链接或加载可能受到影响
-
段错误发生在 NCCL 通信操作时
- 初始化进程组成功,但
all_reduce操作触发崩溃,与数据大小无关,这表明是 NCCL 库在调用底层 CUDA 函数时出错
- 初始化进程组成功,但
5. 吐槽
最后给官方客服提交 bug 时,客服说这个镜像是专门为 5090 准备的,vGPU 不适配,然后告诉我说明在如下图中:

谁能知道这里面有镜像说明哈?不应该在选择镜像的时候进行提醒和说明吗?而且打开文档发现,也并没有提醒用户适配性的问题,只是说 5090、RTX PRO 6000 请使用此镜像,没有表明其他显卡不能用…… 糟糕的文档 🤡
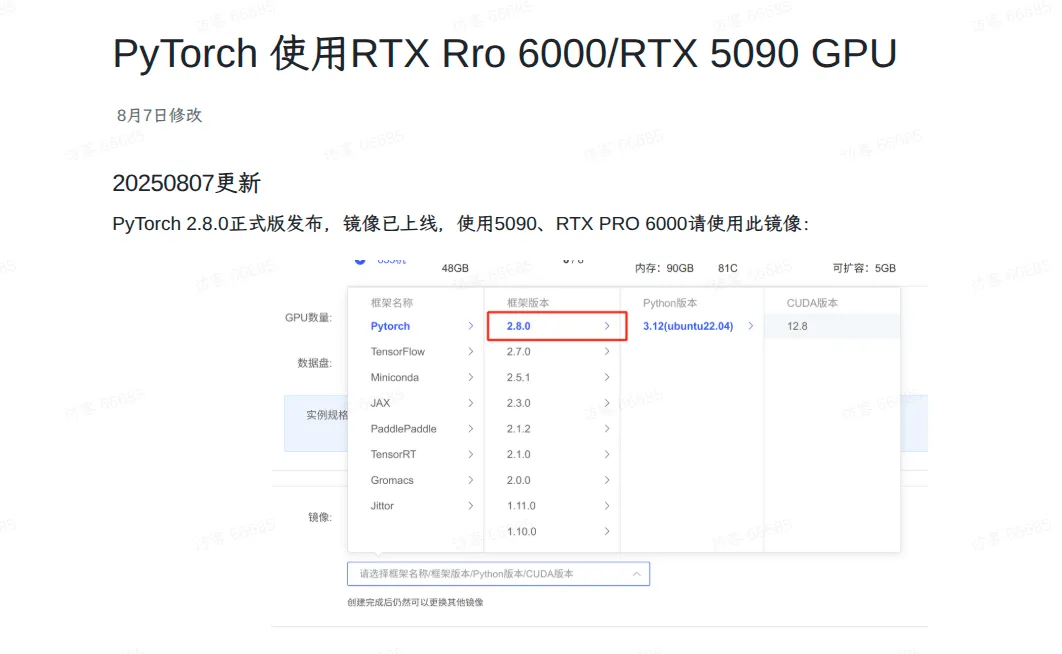
9.7 日,写这篇博客时,再次复现 Bug 时,发现官网已经添加了镜像选择的提示,这算前人栽树后人乘凉嘛 🥹:

控制变量,循序渐进
选择了一个 CUDA 12.4 的镜像,具体环境配置如下:
-
PyTorch 2.5.1
-
Python 3.12
-
CUDA 12.4
① : 创建虚拟环境 & 安装 ms-swift
python -m venv venv
source ./venv/bin/activate

pip install ms-swift
然后测试多卡通信,发现测试也是直接失败 😭,还是同样的错误,更懵逼:
torchrun --nproc_per_node=auto test.py
W0908 17:16:06.669000 502262 torch/distributed/elastic/multiprocessing/api.py:900] Sending process 502325 closing signal SIGTERM
W0908 17:16:06.671000 502262 torch/distributed/elastic/multiprocessing/api.py:900] Sending process 502327 closing signal SIGTERM
W0908 17:16:06.673000 502262 torch/distributed/elastic/multiprocessing/api.py:900] Sending process 502328 closing signal SIGTERM
E0908 17:16:06.802000 502262 torch/distributed/elastic/multiprocessing/api.py:874] failed (exitcode: -11) local_rank: 3 (pid: 502329) of binary: /root/autodl-tmp/test/swift/bin/python
Traceback (most recent call last):
  File "/root/autodl-tmp/test/swift/bin/torchrun", line 8, in <module>
    sys.exit(main())
             ^^^^^^
  File "/root/autodl-tmp/test/swift/lib/python3.12/site-packages/torch/distributed/elastic/multiprocessing/errors/__init__.py", line 357, in wrapper
    return f(*args, **kwargs)
           ^^^^^^^^^^^^^^^^^^
  File "/root/autodl-tmp/test/swift/lib/python3.12/site-packages/torch/distributed/run.py", line 901, in main
    run(args)
  File "/root/autodl-tmp/test/swift/lib/python3.12/site-packages/torch/distributed/run.py", line 892, in run
    elastic_launch(
  File "/root/autodl-tmp/test/swift/lib/python3.12/site-packages/torch/distributed/launcher/api.py", line 143, in __call__
    return launch_agent(self._config, self._entrypoint, list(args))
           ^^^^^^^^^^^^^^^^^^^^^^^^^^^^^^^^^^^^^^^^^^^^^^^^^^^^^^^^
  File "/root/autodl-tmp/test/swift/lib/python3.12/site-packages/torch/distributed/launcher/api.py", line 277, in launch_agent
    raise ChildFailedError(
torch.distributed.elastic.multiprocessing.errors.ChildFailedError:
========================================================
test.py FAILED
--------------------------------------------------------
Failures:
  <NO_OTHER_FAILURES>
--------------------------------------------------------
Root Cause (first observed failure):
[0]:
  time      : 2025-09-08_17:16:06
  host      : autodl-container-9832409e45-1c21efc6
  rank      : 3 (local_rank: 3)
  exitcode  : -11 (pid: 502329)
  error_file: <N/A>
  traceback : Signal 11 (SIGSEGV) received by PID 502329
========================================================
再次询问客服,客服问我是否更换了 torch 的版本,让我尝试在实例自带的 Base 环境进行测试。在主机自带的 Base 环境下,运行通信测试脚本,GPU 通信成功!!输出如下:
torchrun --nproc_per_node=auto test.py
{'bandwidth (GB/s)': 19.37, 'time': 0.581}
[rank0]:[W826 12:00:06.555691651 ProcessGroupNCCL.cpp:1250] Warning: WARNING: process group has NOT been destroyed before we destruct ProcessGroupNCCL. On normal program exit, the application should call destroy_process_group to ensure that any pending NCCL operations have finished in this process. In rare cases this process can exit before this point and block the progress of another member of the process group. This constraint has always been present,  but this warning has only been added since PyTorch 2.4 (function operator())
Amazing,竟然有 torch 的问题。观察pip list 发现,ms-swift 安装的 pytorch 和实例镜像自带的 Base 环境中的 Pytorch 确实不一致。
torch==2.8.0 (from ms-swift)

torch==2.5.1+cu124 (from base)-
2.5.1+cu124:打包时已内置 CUDA 12.4 的 GPU 轮子(同时内置 NCCL),安装后不用本机 CUDA Toolkit 。 -
2.8.0:可能是 CPU 版或通过 PyTorch 官网上的安装选择器拿到的某个 GPU 版,具体以安装的 wheel 为准。
查看 torch==2.8.0 具体的版本信息:
print(torch.__version__, torch.version.cuda, torch.cuda.is_available())
2.8.0+cu128 12.8 True
在这里问题就比较明确了,通过 ms-swift 安装的 torch 针对的是 CUDA 12.8,但是实例的 GPU 只能支持所有低于或等于 12.4 版本的 CUDA Toolkit 编译的程序:
nvidia-smi
NVIDIA-SMI 550.120 Driver Version: 550.120 CUDA Version: 12.4
但事实好像并不是这样 😵💫。从官网查询得知,从 11.0 版本开始,NVIDIA 引入了 CUDA 的 Minor Version Compatibility 。这意味着,在同一主版本号内(12.x),一个较新版本的 CUDA Toolkit (如 12.8) 编译的程序,可以运行在一个支持较低版本 CUDA (如 12.4) 但支持 12.x 的驱动程序上。官网还有几个相似的概念,可能会有些困惑:
| 兼容性类型 | 驱动版本 | CUDA 工具包版本 | 描述 |
| 向后兼容性 (Backward Compatibility) | 新 | 旧 | (默认支持) 新驱动可以运行旧版 CUDA 工具包编译的应用。这是最常见的情况。 |
| 次要版本兼容性 (Minor-Version Compatibility) | 旧 | 新 (主版本号相同) | 在同一主版本号内(如驱动为 525.x,工具包为 12.y),旧驱动可运行新工具包的应用。 |
| 前向兼容性 (Forward Compatibility) | 旧 | 新 (主版本号可不同) | (需兼容包) 跨越主版本号,旧驱动可运行新工具包编译的应用(例如驱动为 525.x,工具包为 13.x)。 |
所以,具体分析现有组件,可以得出:
| 组件 | 版本 | 解释 |
| NVIDIA Driver | 550.120 |
由于版本够新,它通过Minor-Version Compatibility 支持了更新的 CUDA 12.8。 |
nvidia-smi CUDA |
12.4 |
驱动程序原生支持的 CUDA 版本。在有兼容性的情况下,它不再是一个严格的上限,而更像一个参考基线。 |
| PyTorch CUDA | 12.8 |
编译 PyTorch 时使用的工具包版本。 |
torch.cuda.is_available() |
True |
最终的验证结果。这个 True 值确认了整个环境(驱动 + PyTorch)配置正确且可以协同工作。如果存在不兼容问题,这个命令会返回 False 或者程序会直接报错。 |
既然官方支持了“次要版本兼容性”,驱动也满足 12.x,那为什么会导致程序崩溃呢?为了进一步测试兼容性的问题,我新创建了一个实例,镜像一致,但是驱动更新,而且支持的最高 CUDA Version 为 13.0:
+-----------------------------------------------------------------------------------------+
| NVIDIA-SMI 580.76.05              Driver Version: 580.76.05      CUDA Version: 13.0     |
+-----------------------------------------+------------------------+----------------------+
| GPU  Name                 Persistence-M | Bus-Id          Disp.A | Volatile Uncorr. ECC |
| Fan  Temp   Perf          Pwr:Usage/Cap |           Memory-Usage | GPU-Util  Compute M. |
|                                         |                        |               MIG M. |
|=========================================+========================+======================|
|   0  NVIDIA GeForce RTX 4080        On  |   00000000:81:00.0 Off |                  N/A |
| 30%   33C    P8             19W /  320W |       0MiB /  32760MiB |      0%      Default |
|                                         |                        |                  N/A |
+-----------------------------------------+------------------------+----------------------+
|   1  NVIDIA GeForce RTX 4080        On  |   00000000:C3:00.0 Off |                  N/A |
| 30%   32C    P8             10W /  320W |       0MiB /  32760MiB |      0%      Default |
|                                         |                        |                  N/A |
+-----------------------------------------+------------------------+----------------------+
在这个环境上按照同样的流程测试,通信测试成功:
{'bandwidth (GB/s)': 15.47, 'time': 0.727}
[rank0]:[W908 17:25:17.915487590 ProcessGroupNCCL.cpp:1538] Warning: WARNING: destroy_process_group() was not called before program exit, which can leak resources. For more info, please see https://pytorch.org/docs/stable/distributed.html#shutdown (function operator())
综合以上文档、实验和分析,只能得出报错的可能原因是:CUDA 版本不匹配导致 NCCL 在通信阶段崩溃(SIGSEGV)。
完整梳理:
-
swift 安装的 PyTorch 是 2.8.0+cu128,也就是 CUDA 12.8 构建:
print(torch.__version__, torch.version.cuda) → 2.8.0+cu128 12.8 -
宿主机驱动只支持到 CUDA 12.4:
nvidia-smi → CUDA Version: 12.4 (Driver 550.120) -
低于运行时所需的驱动版本时,CUDA/NCCL 常在初始化或集合通信(如 all_reduce)里直接段错误(-11)而不是抛 Python 异常;日志里也显示首个失败进程为
local_rank: 3收到 SIGSEGV。
结论:用 CUDA 12.8 编译的 PyTorch/NCCL 在 仅支持 12.4 的驱动上运行,触发本地库崩溃。
② : 创建虚拟环境 & 安装指定的 torch
这里为了防止其他意外发生,指定了和 Base 环境同样的 torch 版本 2.5.1 进行测试。
python -m venv venv
source ./venv/bin/activate

pip install --index-url https://download.pytorch.org/whl/cu124 \
  torch==2.5.1+cu124
正常运行:
torchrun --nproc_per_node=auto test.py
{'bandwidth (GB/s)': 19.68, 'time': 0.563}
……
在虚拟环境中安装和 Base 环境一样的 Pytorch 也能够测试成功,说明确实是安装的 PyTorch 二进制的问题。
③: ② & 安装 swift
在 ② 操作的基础上,再安装 swift,测试后再次发生了和 ① 一样的错误,查看依赖安装日志,发现 pip 在安装 ms-swift 时,自动卸载了 torch==2.5.1+cu124。此时再运行多卡通信测试,使用的就是 torch==2.7.1 ,所以 SIGSEGV 段错误再次出现。
Collecting torch==2.7.1 (from ms-swift)

Attempting uninstall: torch
    Found existing installation: torch 2.5.1+cu124
    Uninstalling torch-2.5.1+cu124:
      Successfully uninstalled torch-2.5.1+cu124
④: ① & 删除 swift 自带的 torch & 安装指定的 torch
既然 swift 会删除原来的 torch,也并没有提供使用现有的 torch 选项,那就尝试在安装 swift 之后,卸载自带的 torch,再安装 torch==2.5.1+cu124 。此时需要注意的点是,替换 torch 后需要测试 swift 是否能够正常运行,防止 swift 强绑定了特定的 torch 版本。
python -m venv venv
source ./venv/bin/activate

pip install ms-swift

pip uninstall -y torch

pip install --index-url https://download.pytorch.org/whl/cu124 \
  torch==2.5.1+cu124
正常运行:
torchrun --nproc_per_node=auto test.py
{'bandwidth (GB/s)': 18.79, 'time': 0.578}
……
⑤: ④ & 使用已有的 torch 从头编译 vllm
和直接安装 ms-swift 同理,安装 vllm 也会覆盖原有安装的 Pytorch,但是如果安装 vllm 后,再进行替换,会导致 Vllm 不可用,因为 vllm 为了保证其内部 CUDA 扩展的兼容性,通常会严格绑定一个特定的 PyTorch 版本。替换自定义的 Pytorch也会导致不兼容,使 vllm 无法使用。所以这里根据官方文档使用已有的 torch 从头编译 vllm:
https://docs.vllm.ai/en/v0.8.0/getting_started/installation/gpu.html#build-wheel-from-source
刚开始也是没动脑子,直接 clone 最新的代码库就编译了,编译报错:
/root/vllm/csrc/quantization/gptq_marlin/gptq_marlin.cu(911): error:
namespace "at" has no member "Float8_e8m0fnu"
日志说明现在编译的 vLLM 代码启用了 FP8 相关内核,并引用了 PyTorch C++ 里较新的 dtype(at::Float8_e8m0fnu)。而当前环境里的 PyTorch=2.5.1 的头文件里还没有这个类型(CMake 也警告 “Pytorch version 2.7.1 expected…”)。换句话说:vLLM 当前源码分支比当前环境中的 PyTorch 版本新,所以编译时找不到该符号,导致失败。然后我也再次没动脑子的采用了 ChatGPT 的建议:
社区里在 torch 2.5.1 + CUDA 12.4 下成功安装 vLLM 0.7.3 的案例很多。
git clone https://github.com/vllm-project/vllm.git
cd vllm
git checkout v0.7.3

# 修改构建配置,使其在编译时使用环境中已安装的 PyTorch,而不是重新下载
python use_existing_torch.py

# 以可编辑模式安装,--no-build-isolation 确保使用当前环境的包
pip install -e . --no-build-isolation
编译时,由于没有设置 MAX_JOBS ,导致编译过程中并发数太大,直接导致内存爆炸(OOM Killed):
FAILED: [code=137] CMakeFiles/_C.dir/csrc/quantization/gptq_marlin/gptq_marlin_repack.cu.o
  /usr/local/cuda/bin/nvcc -forward-unknown-to-host-compiler -DCUTLASS_ENABLE_DIRECT_CUDA_DRIVER_CALL=1 -DPy_LIMITED_API=3 -DTORCH_EXTENSION_NAME=_C -DUSE_C10D_GLOO -DUSE_C10D_NCCL -DUSE_DISTRIBUTED -DUSE_RPC -DUSE_TENSORPIPE -D_C_EXPORTS -I/root/vllm/csrc -I/root/vllm/.deps/cutlass-src/include -isystem /root/miniconda3/include/python3.12 -isystem /root/venv/lib/python3.12/site-packages/torch/include -isystem /root/venv/lib/python3.12/site-packages/torch/include/torch/csrc/api/include -isystem /usr/local/cuda/include -DONNX_NAMESPACE=onnx_c2 -Xcudafe --diag_suppress=cc_clobber_ignored,--diag_suppress=field_without_dll_interface,--diag_suppress=base_class_has_different_dll_interface,--diag_suppress=dll_interface_conflict_none_assumed,--diag_suppress=dll_interface_conflict_dllexport_assumed,--diag_suppress=bad_friend_decl --expt-relaxed-constexpr --expt-extended-lambda -O2 -g -DNDEBUG -std=c++17 -Xcompiler=-fPIC --expt-relaxed-constexpr -DENABLE_FP8 --threads=1 -DENABLE_SCALED_MM_C2X=1 -D_GLIBCXX_USE_CXX11_ABI=0 -gencode arch=compute_89,code=sm_89 -MD -MT CMakeFiles/_C.dir/csrc/quantization/gptq_marlin/gptq_marlin_repack.cu.o -MF CMakeFiles/_C.dir/csrc/quantization/gptq_marlin/gptq_marlin_repack.cu.o.d -x cu -c /root/vllm/csrc/quantization/gptq_marlin/gptq_marlin_repack.cu -o CMakeFiles/_C.dir/csrc/quantization/gptq_marlin/gptq_marlin_repack.cu.o
Killed-
现象: 在编译过程中,特别是编译 FlashAttention 等复杂的 CUDA 内核时,进程突然终止,日志中出现
Killed字样或exitcode: 137。 -
分析: 这是典型的内存不足(Out of Memory)信号。
nvcc编译器在进行模板实例化时会消耗大量内存,如果pip的并行编译任务数(MAX_JOBS)过高,很容易超出实例的物理内存上限。 -
解决: 限制并行编译任务数。
# nproc 返回 CPU 核心数,留出2个核心避免系统卡死
export MAX_JOBS=$(( $(nproc) - 2 ))
pip install -e . --no-build-isolation
一杯咖啡时间后,编译成功:
  Building editable for vllm (pyproject.toml) ... done
  Created wheel for vllm: filename=vllm-0.7.4.dev0+ged6e9075d.d20250826.cu124-0.editable-cp312-cp312-linux_x86_64.whl size=16545 sha256=a1740fb3cb6beff3913e68a26592343c7dbf5ce0478866a41095575defdcee6e
  Stored in directory: /tmp/pip-ephem-wheel-cache-fwv91bp8/wheels/9a/ac/c8/e1c294b1a6231933ff222fd2f4d1a1fe7613ee1ff453105f6b
Successfully built vllm
Installing collected packages: vllm
  changing mode of /root/venv/bin/vllm to 755
Successfully installed vllm-0.7.4.dev0+ged6e9075d.d20250826.cu124
测试通信,多卡通信正常,yeah ^_^
torchrun --nproc_per_node=auto test.py
{'bandwidth (GB/s)': 20.13, 'time': 0.542}
……
运行时问题诊断与分析
环境就绪后,开始进行完整的模型部署,但新的问题也随之而来。
1. 因 vLLM 版本不匹配导致的显存溢出 (OOM)
这个问题的根本原因在于编译的 Vllm 版本太低,还未对 Qwen3 Model 进行适配 🥲。也是自己疏忽,直接选择了 ChatGPT 提供的版本,ChatGPT 是根据 CUDA Version 进行选择的,但是没有考虑到模型的问题。
-
现象: 服务启动时,显存被迅速占满,并抛出
torch.OutOfMemoryError。但根据先前的计算,显存是足够用于推理的,在加载阶段报错,应该是其他问题。WARNING 08-27 10:32:42 utils.py:78] Qwen3ForCausalLM has no vLLM implementation, falling back to Transformers implementation. Some features may not be supported and performance may not be optimal. INFO 08-27 10:32:42 transformers.py:129] Using Transformers backend. (VllmWorkerProcess pid=19720) WARNING 08-27 10:32:42 utils.py:78] Qwen3ForCausalLM has no vLLM implementation, falling back to Transformers implementation. Some features may not be supported and performance may not be optimal. (VllmWorkerProcess pid=19721) WARNING 08-27 10:32:42 utils.py:78] Qwen3ForCausalLM has no vLLM implementation, falling back to Transformers implementation. Some features may not be supported and performance may not be optimal. (VllmWorkerProcess pid=19720) INFO 08-27 10:32:42 transformers.py:129] Using Transformers backend. (VllmWorkerProcess pid=19719) WARNING 08-27 10:32:42 utils.py:78] Qwen3ForCausalLM has no vLLM implementation, falling back to Transformers implementation. Some features may not be supported and performance may not be optimal. (VllmWorkerProcess pid=19721) INFO 08-27 10:32:42 transformers.py:129] Using Transformers backend. (VllmWorkerProcess pid=19719) INFO 08-27 10:32:42 transformers.py:129] Using Transformers backend. …… [rank0]: torch.OutOfMemoryError: CUDA out of memory. Tried to allocate 250.00 MiB. GPU 0 has a total capacity of 31.60 GiB of which 50.12 MiB is free. Process 700393 has 31.54 GiB memory in use. Of the allocated memory 31.18 GiB is allocated by PyTorch, and 1.34 MiB is reserved by PyTorch but unallocated. If reserved but unallocated memory is large try setting PYTORCH_CUDA_ALLOC_CONF=expandable_segments:True to avoid fragmentation. See documentation for Memory Management (https://pytorch.org/docs/stable/notes/cuda.html#environment-variables)Qwen3ForCausalLM has no vLLM implementation, falling back to Transformers implementation -
根本原因: 从日志中可以看到,该 vLLM 版本不原生支持 Qwen3 模型,因此自动回退到 HuggingFace Transformers 库的后端实现。
2. 多卡环境下 LoRA 加载超时
查看官方的 Release 信息,可以得知 Vllm 是在 V0.8.4 开始支持 Qwen3 的,考虑到 V0.8.5 还修复了一些 bug,所以我选择升级 vLLM==0.8.5 并重新编译:
git clone https://github.com/vllm-project/vllm.git
cd vllm

# v0.8.4 开始支持 qwen3:https://github.com/vllm-project/vllm/issues/17630#issuecomment-2849177529
git checkout v0.8.5

python use_existing_torch.py

# 后续的版本,vllm 提供了编译所需的依赖清单,可以便捷的提前安装,但是实际过程中,可能还是会缺少相关依赖
pip install -r requirements/build.txt

export MAX_JOBS=$(( $(nproc) - 2 ))  # 太大的并发会导致内存超载
pip install -e . --no-build-isolation --no-deps -v
又一次尝试运行部署脚本之后,终于部署成功了!!!
[INFO:swift] swift.__version__: 3.7.2
[INFO:swift] model_list: ['Qwen3-32B']
INFO:     Started server process [342703]
INFO:     Waiting for application startup.
INFO:     Application startup complete.
INFO:     Uvicorn running on http://0.0.0.0:8000 (Press CTRL+C to quit)
但尝试请求服务进行推理时,新的问题出现了 🤡。大概就是 vllm 多进程推理时等待 worker 响应超时,出现超时错误:
日志如下,稍微长
ERROR 08-27 15:27:24 [core.py:398] EngineCore encountered a fatal error.
ERROR 08-27 15:27:24 [core.py:398] Traceback (most recent call last):
ERROR 08-27 15:27:24 [core.py:398]   File "/root/deploy/vllm/vllm/v1/executor/multiproc_executor.py", line 181, in collective_rpc
ERROR 08-27 15:27:24 [core.py:398]     status, result = w.worker_response_mq.dequeue(
ERROR 08-27 15:27:24 [core.py:398]                      ^^^^^^^^^^^^^^^^^^^^^^^^^^^^^
ERROR 08-27 15:27:24 [core.py:398]   File "/root/deploy/vllm/vllm/distributed/device_communicators/shm_broadcast.py", line 479, in dequeue
ERROR 08-27 15:27:24 [core.py:398]     with self.acquire_read(timeout, cancel) as buf:
ERROR 08-27 15:27:24 [core.py:398]   File "/root/miniconda3/lib/python3.12/contextlib.py", line 137, in __enter__
ERROR 08-27 15:27:24 [core.py:398]     return next(self.gen)
ERROR 08-27 15:27:24 [core.py:398]            ^^^^^^^^^^^^^^
ERROR 08-27 15:27:24 [core.py:398]   File "/root/deploy/vllm/vllm/distributed/device_communicators/shm_broadcast.py", line 443, in acquire_read
ERROR 08-27 15:27:24 [core.py:398]     raise TimeoutError
ERROR 08-27 15:27:24 [core.py:398] TimeoutError
ERROR 08-27 15:27:24 [core.py:398]
ERROR 08-27 15:27:24 [core.py:398] The above exception was the direct cause of the following exception:
ERROR 08-27 15:27:24 [core.py:398]
ERROR 08-27 15:27:24 [core.py:398] Traceback (most recent call last):
ERROR 08-27 15:27:24 [core.py:398]   File "/root/deploy/vllm/vllm/v1/engine/core.py", line 389, in run_engine_core
ERROR 08-27 15:27:24 [core.py:398]     engine_core.run_busy_loop()
ERROR 08-27 15:27:24 [core.py:398]   File "/root/deploy/vllm/vllm/v1/engine/core.py", line 413, in run_busy_loop
ERROR 08-27 15:27:24 [core.py:398]     self._process_engine_step()
ERROR 08-27 15:27:24 [core.py:398]   File "/root/deploy/vllm/vllm/v1/engine/core.py", line 438, in _process_engine_step
ERROR 08-27 15:27:24 [core.py:398]     outputs = self.step_fn()
ERROR 08-27 15:27:24 [core.py:398]               ^^^^^^^^^^^^^^
ERROR 08-27 15:27:24 [core.py:398]   File "/root/deploy/vllm/vllm/v1/engine/core.py", line 203, in step
ERROR 08-27 15:27:24 [core.py:398]     output = self.model_executor.execute_model(scheduler_output)
ERROR 08-27 15:27:24 [core.py:398]              ^^^^^^^^^^^^^^^^^^^^^^^^^^^^^^^^^^^^^^^^^^^^^^^^^^^
ERROR 08-27 15:27:24 [core.py:398]   File "/root/deploy/vllm/vllm/v1/executor/multiproc_executor.py", line 146, in execute_model
ERROR 08-27 15:27:24 [core.py:398]     (output, ) = self.collective_rpc("execute_model",
ERROR 08-27 15:27:24 [core.py:398]                  ^^^^^^^^^^^^^^^^^^^^^^^^^^^^^^^^^^^^
ERROR 08-27 15:27:24 [core.py:398]   File "/root/deploy/vllm/vllm/v1/executor/multiproc_executor.py", line 193, in collective_rpc
ERROR 08-27 15:27:24 [core.py:398]     raise TimeoutError(f"RPC call to {method} timed out.") from e
ERROR 08-27 15:27:24 [core.py:398] TimeoutError: RPC call to execute_model timed out.
ERROR 08-27 15:27:24 [async_llm.py:399] AsyncLLM output_handler failed.
ERROR 08-27 15:27:24 [async_llm.py:399] Traceback (most recent call last):
ERROR 08-27 15:27:24 [async_llm.py:399]   File "/root/deploy/vllm/vllm/v1/engine/async_llm.py", line 357, in output_handler
ERROR 08-27 15:27:24 [async_llm.py:399]     outputs = await engine_core.get_output_async()
ERROR 08-27 15:27:24 [async_llm.py:399]               ^^^^^^^^^^^^^^^^^^^^^^^^^^^^^^^^^^^^
ERROR 08-27 15:27:24 [async_llm.py:399]   File "/root/deploy/vllm/vllm/v1/engine/core_client.py", line 716, in get_output_async
ERROR 08-27 15:27:24 [async_llm.py:399]     raise self._format_exception(outputs) from None
ERROR 08-27 15:27:24 [async_llm.py:399] vllm.v1.engine.exceptions.EngineDeadError: EngineCore encountered an issue. See stack trace (above) for the root cause.
[INFO:swift] Traceback (most recent call last):
  File "/root/deploy/venv/lib/python3.12/site-packages/swift/llm/infer/deploy.py", line 173, in create_chat_completion
    res_or_gen = await self.infer_async(infer_request, request_config, template=self.template, **infer_kwargs)
                 ^^^^^^^^^^^^^^^^^^^^^^^^^^^^^^^^^^^^^^^^^^^^^^^^^^^^^^^^^^^^^^^^^^^^^^^^^^^^^^^^^^^^^^^^^^^^^
  File "/root/deploy/venv/lib/python3.12/site-packages/swift/llm/infer/infer_engine/vllm_engine.py", line 577, in infer_async
    return await self._infer_full_async(**kwargs)
           ^^^^^^^^^^^^^^^^^^^^^^^^^^^^^^^^^^^^^^
  File "/root/deploy/venv/lib/python3.12/site-packages/swift/llm/infer/infer_engine/vllm_engine.py", line 447, in _infer_full_async
    async for result in result_generator:
  File "/root/deploy/vllm/vllm/v1/engine/async_llm.py", line 306, in generate
    out = q.get_nowait() or await q.get()
                            ^^^^^^^^^^^^^
  File "/root/deploy/vllm/vllm/v1/engine/output_processor.py", line 51, in get
    raise output
  File "/root/deploy/vllm/vllm/v1/engine/async_llm.py", line 357, in output_handler
    outputs = await engine_core.get_output_async()
              ^^^^^^^^^^^^^^^^^^^^^^^^^^^^^^^^^^^^
  File "/root/deploy/vllm/vllm/v1/engine/core_client.py", line 716, in get_output_async
    raise self._format_exception(outputs) from None
vllm.v1.engine.exceptions.EngineDeadError: EngineCore encountered an issue. See stack trace (above) for the root cause.

INFO:     127.0.0.1:55766 - "POST /v1/chat/completions HTTP/1.1" 400 Bad Request
Process EngineCore_0:
Traceback (most recent call last):
  File "/root/deploy/vllm/vllm/v1/executor/multiproc_executor.py", line 181, in collective_rpc
    status, result = w.worker_response_mq.dequeue(
                     ^^^^^^^^^^^^^^^^^^^^^^^^^^^^^
  File "/root/deploy/vllm/vllm/distributed/device_communicators/shm_broadcast.py", line 479, in dequeue
    with self.acquire_read(timeout, cancel) as buf:
  File "/root/miniconda3/lib/python3.12/contextlib.py", line 137, in __enter__
    return next(self.gen)
           ^^^^^^^^^^^^^^
  File "/root/deploy/vllm/vllm/distributed/device_communicators/shm_broadcast.py", line 443, in acquire_read
    raise TimeoutError
TimeoutError

The above exception was the direct cause of the following exception:

Traceback (most recent call last):
  File "/root/miniconda3/lib/python3.12/multiprocessing/process.py", line 314, in _bootstrap
    self.run()
  File "/root/miniconda3/lib/python3.12/multiprocessing/process.py", line 108, in run
    self._target(*self._args, **self._kwargs)
  File "/root/deploy/vllm/vllm/v1/engine/core.py", line 400, in run_engine_core
    raise e
  File "/root/deploy/vllm/vllm/v1/engine/core.py", line 389, in run_engine_core
    engine_core.run_busy_loop()
  File "/root/deploy/vllm/vllm/v1/engine/core.py", line 413, in run_busy_loop
    self._process_engine_step()
  File "/root/deploy/vllm/vllm/v1/engine/core.py", line 438, in _process_engine_step
    outputs = self.step_fn()
              ^^^^^^^^^^^^^^
  File "/root/deploy/vllm/vllm/v1/engine/core.py", line 203, in step
    output = self.model_executor.execute_model(scheduler_output)
             ^^^^^^^^^^^^^^^^^^^^^^^^^^^^^^^^^^^^^^^^^^^^^^^^^^^
  File "/root/deploy/vllm/vllm/v1/executor/multiproc_executor.py", line 146, in execute_model
    (output, ) = self.collective_rpc("execute_model",
                 ^^^^^^^^^^^^^^^^^^^^^^^^^^^^^^^^^^^^
  File "/root/deploy/vllm/vllm/v1/executor/multiproc_executor.py", line 193, in collective_rpc
    raise TimeoutError(f"RPC call to {method} timed out.") from e
TimeoutError: RPC call to execute_model timed out.
RPC(Remote Procedure Call): 远程过程调用。在 vLLM 中,主进程通过 RPC 指令与各个 GPU 上的工作进程(worker)通信。
2.1 开始怀疑是否是 Lora 的问题
既然能够成功部署并且多卡 GPU 之间也能正常通信,说明环境大致没问题了(应该还是有问题的,因为我本地非容器环境直接跑通了)。开始排查是否和 Lora 有关联?所以尝试不加载 Lora adapter 进行部署:
INFO 08-27 15:40:21 [core_client.py:439] Core engine process 0 ready.
[INFO:swift] Start time of running main: 2025-08-27 15:40:21.289667
[INFO:swift] swift.__version__: 3.7.2
[INFO:swift] model_list: ['Qwen3-32B']
INFO:     Started server process [324189]
INFO:     Waiting for application startup.
INFO:     Application startup complete.
INFO:     Uvicorn running on http://0.0.0.0:8000 (Press CTRL+C to quit)
[INFO:swift] {'num_prompt_tokens': 0, 'num_generated_tokens': 0, 'num_samples': 0, 'runtime': 20.02017536, 'samples/s': 0.0, 'tokens/s': 0.0}
INFO:     127.0.0.1:52810 - "GET /v1/models HTTP/1.1" 200 OK
DEBUG 08-27 15:42:02 [core.py:427] EngineCore loop active.
DEBUG 08-27 15:42:08 [core.py:421] EngineCore waiting for work.
[INFO:swift] {'response': '<think>\nOkay, the user just said "hi". That\'s a greeting. I should respond in a friendly and welcoming manner. Maybe ask them how they\'re doing and offer assistance. Let me make sure the tone is positive and open. Also, keep it concise but warm. Let\'s go with something like, "Hello! How are you today? Let me know if there\'s anything I can help you with!" That should cover it.\n</think>\n\nHello! How are you today? Let me know if there\'s anything I can help you with! 😊', 'infer_request': {'messages': [{'role': 'user', 'content': 'hi'}], 'images': [], 'audios': [], 'videos': [], 'tools': None, 'objects': {}}, 'generation_config': SamplingParams(n=1, presence_penalty=0.0, frequency_penalty=0.0, repetition_penalty=1.0, temperature=0.7, top_p=0.95, top_k=20, min_p=0.0, seed=None, stop=['<|endoftext|>', '<|im_end|>'], stop_token_ids=[151643, 151645], bad_words=[], include_stop_str_in_output=False, ignore_eos=False, max_tokens=4096, min_tokens=0, logprobs=None, prompt_logprobs=None, skip_special_tokens=True, spaces_between_special_tokens=True, truncate_prompt_tokens=None, guided_decoding=None, extra_args=None)}
INFO:     127.0.0.1:52810 - "POST /v1/chat/completions HTTP/1.1" 200 OK
[INFO:swift] {'num_prompt_tokens': 9, 'num_generated_tokens': 114, 'num_samples': 1, 'runtime': 20.02019962, 'samples/s': 0.04994955, 'tokens/s': 5.69424892}
Ohhhhh,推理成功了,通过消融实验确定了就是 Lora 的问题,yeah 🤗!既然不加载 LoRA 时一切正常,问题显然出在 vLLM 动态加载 LoRA 的过程。
AI: 在当前的多卡容器环境中,vLLM worker 进程在尝试应用 LoRA 权重时,其内部的进程间通信(IPC)机制出现了问题。这很可能与容器环境对共享内存(
/dev/shm)的默认配置较小有关,导致 worker 进程在通信或等待资源时被卡死或崩溃,主进程因收不到响应而超时。
df -h /dev/shm

Filesystem      Size  Used Avail Use% Mounted on
shm             180G  315M  180G   1% /dev/shm
但好像其实也不是很小 🤔?
至于当前环境为什么应用 Lora 时就会通信问题,还是个未解问题。
3. 采用 LoRA 离线合并策略
既然在当前的特定环境下,动态加载 LoRA 会引发问题,所以尝试离线合并 Lora,将 LoRA 的权重合并到基础模型中,然后在部署时加载合并后的模型,避免应用 Lora。
swift export \
  --model /root/autodl-tmp/Qwen3-32B \
  --adapters /root/autodl-tmp/checkpoint \
  --merge_lora true \
  --output_dir /root/autodl-tmp/Qwen3-32B-merged
……
[INFO:swift] Merge LoRA...
[INFO:swift] Saving merged weights...
[INFO:swift] Successfully merged LoRA and saved in /root/autodl-tmp/Qwen3-32B-merged.
[INFO:swift] End time of running main: 2025-08-27 15:56:40.548658
然后部署这个合并后的模型,此时部署脚本就不再需要 --adapters 参数了:
CUDA_VISIBLE_DEVICES=0,1,2,3 \
swift deploy \
  --model /root/autodl-tmp/Qwen3-32B-merged \
  --infer_backend vllm \
  --tensor_parallel_size 4 \
  --max_model_len 8192 \
  --max_new_tokens 4096
苦尽甘来,这一次,终于推理成功了 🥹。使用训练时的 PROMPT 进行测试,回复也遵循训练时要求的格式,说明 Lora 应用成功。问题解决!Bingo~
[INFO:swift] Start time of running main: 2025-08-27 16:00:01.812431
[INFO:swift] swift.__version__: 3.7.2
[INFO:swift] model_list: ['Qwen3-32B-merged']
INFO:     Started server process [342703]
INFO:     Waiting for application startup.
INFO:     Application startup complete.
INFO:     Uvicorn running on http://0.0.0.0:8000 (Press CTRL+C to quit)
INFO:     127.0.0.1:47658 - "GET /v1/models HTTP/1.1" 200 OK
DEBUG 08-27 16:00:08 [core.py:427] EngineCore loop active.
DEBUG 08-27 16:00:09 [core.py:421] EngineCore waiting for work.
[INFO:swift] {'response': '<|begin▁of▁sentence|>Hello! How can I assist you today?', 'infer_request': {'messages': [{'role': 'user', 'content': 'hi'}], 'images': [], 'audios': [], 'videos': [], 'tools': None, 'objects': {}}, 'generation_config': SamplingParams(n=1, presence_penalty=0.0, frequency_penalty=0.0, repetition_penalty=1.0, temperature=0.7, top_p=0.95, top_k=20, min_p=0.0, seed=None, stop=['<|endoftext|>', '<|im_end|>'], stop_token_ids=[151643, 151645], bad_words=[], include_stop_str_in_output=False, ignore_eos=False, max_tokens=4096, min_tokens=0, logprobs=None, prompt_logprobs=None, skip_special_tokens=True, spaces_between_special_tokens=True, truncate_prompt_tokens=None, guided_decoding=None, extra_args=None)}
INFO:     127.0.0.1:47658 - "POST /v1/chat/completions HTTP/1.1" 200 OK
[INFO:swift] {'num_prompt_tokens': 9, 'num_generated_tokens': 21, 'num_samples': 1, 'runtime': 20.09058955, 'samples/s': 0.04977455, 'tokens/s': 1.04526549}
INFO:     127.0.0.1:55986 - "GET /v1/models HTTP/1.1" 200 OK
DEBUG 08-27 16:00:22 [core.py:427] EngineCore loop active.
[INFO:swift] {'num_prompt_tokens': 0, 'num_generated_tokens': 0, 'num_samples': 0, 'runtime': 20.01930022, 'samples/s': 0.0, 'tokens/s': 0.0}
DEBUG 08-27 16:01:01 [core.py:421] EngineCore waiting for work.
[INFO:swift] {'response': "<result>Yes</result>\n<analysis></analysis>", 'infer_request': {'messages': [{'role': 'user', 'content': '\nYou are a professional software security analyst, proficient in code auditing, vulnerability analysis, and providing repair suggestions. Your task is to analyze the provided code snippet and clearly determine whether it contains a vulnerability.\n\nInstructions:\n- Carefully review the code snippet below.\n- Output your conclusion strictly as either "Yes" or "No" in the `<result>` tag.\n  - "Yes" if the code is vulnerable.\n  - "No" if the code is not vulnerable.\n- Provide a detailed explanation in the `<analysis>` tag.\n\nThe code snippet:\n<code>\nbool DependencyOptimizer::SafeToRemoveIdentity(const NodeDef& node) const {\n  if (!IsIdentity(node) && !IsIdentityN(node)) {\n    return true;\n  }\n\n  if (nodes_to_preserve_.find(node.name()) != nodes_to_preserve_.end()) {\n    return false;\n  }\n  if (!fetch_nodes_known_) {\n    // The output values of this node may be needed.\n    return false;\n  }\n\n  if (node.input_size() < 1) {\n    // Node lacks input, is invalid\n    return false;\n  }\n\n  const NodeDef* input = node_map_->GetNode(NodeName(node.input(0)));\n  CHECK(input != nullptr) << "node = " << node.name()\n                          << " input = " << node.input(0);\n  // Don\'t remove Identity nodes corresponding to Variable reads or following\n  // Recv.\n  if (IsVariable(*input) || IsRecv(*input)) {\n    return false;\n  }\n  for (const auto& consumer : node_map_->GetOutputs(node.name())) {\n    if (node.input_size() > 1 && (IsRetval(*consumer) || IsMerge(*consumer))) {\n      return false;\n    }\n    if (IsSwitch(*input)) {\n      for (const string& consumer_input : consumer->input()) {\n        if (consumer_input == AsControlDependency(node.name())) {\n          return false;\n        }\n      }\n    }\n  }\n  return true;\n}\n</code>\n\nResponse Format (strictly follow this):\n<result>\n[Yes or No]\n</result>\n<analysis>\n[A clear, detailed analysis of your reasoning.]\n</analysis>\n\nNote:\n- Only output "Yes" or "No" (no other text) within the `<result>` tag.  \n- Always provide supporting analysis in the `<analysis>` tag.\n\n'}], 'images': [], 'audios': [], 'videos': [], 'tools': None, 'objects': {}}, 'generation_config': SamplingParams(n=1, presence_penalty=0.0, frequency_penalty=0.0, repetition_penalty=1.0, temperature=0.7, top_p=0.95, top_k=20, min_p=0.0, seed=None, stop=['<|endoftext|>', '<|im_end|>'], stop_token_ids=[151643, 151645], bad_words=[], include_stop_str_in_output=False, ignore_eos=False, max_tokens=4096, min_tokens=0, logprobs=None, prompt_logprobs=None, skip_special_tokens=True, spaces_between_special_tokens=True, truncate_prompt_tokens=None, guided_decoding=None, extra_args=None)}
INFO:     127.0.0.1:55986 - "POST /v1/chat/completions HTTP/1.1" 200 OK
[INFO:swift] {'num_prompt_tokens': 499, 'num_generated_tokens': 874, 'num_samples': 1, 'runtime': 20.0201995, 'samples/s': 0.04994955, 'tokens/s': 43.65590862}
服务上线,远程访问
根据需求,需要将服务暴露给外部调用,但 AutoDL 平台的容器默认没有公网 IP,除非进行企业认证。对于非企业用户,平台提供了将容器内 6006 或 6008 端口映射到公网的“自定义服务”功能。因此,将本地 6006 端口的流量转发到 vLLM 默认的 8000 端口。
容器内设置端口转发
https://www.autodl.com/docs/proxy_in_instance/
使用 AutoDL 官方提供的 proxy_in_instance 工具进行端口转发:
wget https://autodl-public.ks3-cn-beijing.ksyuncs.com/tool/api-proxy/proxy_in_instance
chmod +x proxy_in_instance
cat > config.yaml <<'EOF'
proxies:
  - host_and_port: http://127.0.0.1:8000
    route_path: /*     # 把所有路径转发到 8000
EOF

# 程序会在 6006 端口起一个转发服务
tmux new -s proxy_session

./proxy_in_instance
为确保 SSH 断开后服务能持续运行,这里使用了使用 tmux ,当然也可以用 nohup。
本地建立 SSH 隧道,实现端口转发
ssh -CNg -L 6006:127.0.0.1:6006 root@<autodl-ssh-host> -p <ssh-port>-
-C:启用压缩,提高数据传输效率,尤其是在带宽有限时有帮助。 -
-N:不执行远程命令,仅用于端口转发(不会打开 shell)。 -
-g:允许远程主机连接本地端口(通常用于端口转发,但在本地转发时一般不用,写了也无妨)。 -
-L [本地端口]:[远程地址]:[远程端口]:-L 6006:127.0.0.1:6006-
6006(本地端口)
-
指的是你本地电脑上的端口号。
-
访问
localhost:6006时,数据会通过 SSH 隧道转发。
-
-
127.0.0.1(远程地址)
-
指的是远程主机上的地址。
-
127.0.0.1表示远程主机自身(即远程服务器的本地环回地址)。
-
-
6006(远程端口)
- 指的是远程主机上的端口号。
-
整个命令就是通过建立一个 SSH 隧道,将本地 6006 端口流量转发到远程服务器的 6006 端口,便于在本地访问远程服务。
Swift 部署的服务支持兼容 OpenAI 格式调用,所以在本地可以很便捷的调用 LLM 进行推理了:
from openai import OpenAI

client = OpenAI(
    api_key="EMPTY",
    base_url="http://127.0.0.1:6006/v1",
)

model = client.models.list().data[0].id
print(f"model: {model}")

content = "hi"
messages = [{"role": "user", "content": content}]
resp = client.chat.completions.create(
    model=model, messages=messages, temperature=0.7
)
response = resp.choices[0].message.content

print(f"Response: {response}")
总结
本次在 AutoDL 平台上部署 Qwen3-32B LoRA 模型,是一次深入的环境配置、依赖管理和问题排查的实践,也算是第一次完整的训练、部署和迁移模型,学到了很多东西,尽管过程中被各种报错整的小崩溃 🥲。btw,虽然整个过程 AI 辅助了很多操作,但是核心的排查思路还是自己一点点探索的,所以在部署成功的那一刻,我好想感受到了 LLM 还未出现之前,自己一点点排查程序 bug 到跑通的激动 😋